Thursday, July 14, 2011

Project: Cappuchino Milk Bath

This delicious scented milk bath combines skin soothing Oat Flour with gently exfoliating Milk Powder to create a luscious, skin pleasing combination that you and your tub will love.  The sweet, familiar aroma of our Vanilla Frappuccino Fragrance Oil adds an indulgent twist to this recipe, but it can also be made with all natural aromatics.  Treat yourself, or a fellow latte lover to this yummy bath time treat.
CappuccinoMilkBath
Cappuccino Milk Bath 
Makes 1 20 oz. (by volume) Container
Ingredients

Directions
In a medium sized mixing bowl, combine the Baking Soda and Dendritic Salt, and stir well.  Measure and pour 1/2 ounce of Vanilla Frappuccino Fragrance Oil into the bowl and mix it well to disperse the oil.  Next, add 1 cup of Oat Flour and 1 cup of Whole Milk Powder and stir again, making sure to break up any clumps.  Measure 1/2 cup of the mixture and set it aside in a smaller bowl.  Add two tablespoons of Cocoa Powder to the large portion of mixture and stir it well to disperse its color.  You can add more Cocoa Powder if you want the color of the powder to be more dramatic.  Spoon the brown mixture into the container first, followed by the white portion of mixture.  Make sure to tap the powder down as you are filling the container so that you can fill it completely.
Usage & Packaging
This recipe was created for use with our 3x6 Acetate Rounds, but it would look lovely in almost any tall, clear jar.  Make your batch look extra scrumptious by adding a Wooden Scoop, a Brown Ribbon, and our Printable Tags.  Download them here: Download Cappuccino Milk Bath Labels

*To create an all natural version of this recipe, substitute Roasted Coffee Oil and a few drops of Vanilla Absolute for the Fragrance Oil.

from: The Natural Beauty Workshop

Tuesday, July 12, 2011

Summer Time Grass Soap

Monday, July 11, 2011

Urban Art using Colored Drinking Cups - very cool!

For all the geeky gamers out there - check this out!  Here's the link to Pixeled Fence, a gamer's urban art project.  He talks about how he constructed them, and has pictures of his son and daughter helping him too.  He used spray paint and a bunch of cups to put this together.  A paper blue print with the layout of the color pixels helped!  These are located in Utah, but maybe this art form will spread to other areas as well!
Metroid Pixel Art Cup Close up
Details
  • Subject: Classic Metroid (Nintendo Game)
  • Location: Provo, UT. Carterville Rd over University Ave
  • Cup Count: 670
  • Colors: 7 (About 9 cans of spray paint)
  • Build Time: About 2 Hours


Details
  • Subject: Classic Mega Man (Nintendo Game)
  • Location: Provo, UT.  Carterville Rd over University Ave
  • Cup Count: 731
  • Colors: 6 (About 8 cans of spray paint)
  • Build Time: About 1.5 Hours

Saturday, July 9, 2011

Teacup Candles

Continuing on the teacup theme...
here's a craft that I have made - I used the chinese/japanese style tea cups for my candles but these european ones with handles work well too.

Thursday, July 7, 2011

Teacup Pincusions

Wednesday, July 6, 2011

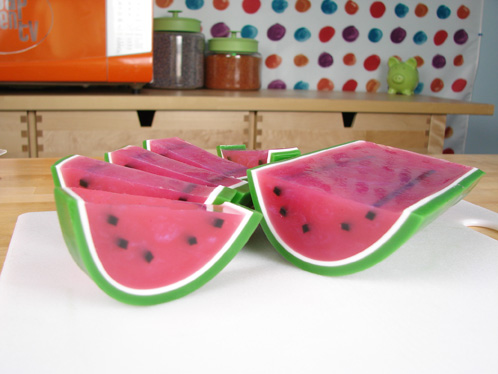
Get Clean with Juicy Watermelons!

Summer time reminds me of BBQs, pool parties, and yummy watermelons!  Here's a soapy version of this favorite summer time fruit.  This project incorporates a lot of interesting techniques you can use for other projects. 


Ingredients
OR buy all of the ingredients you need just by clicking on the “Buy It Now” icon below.

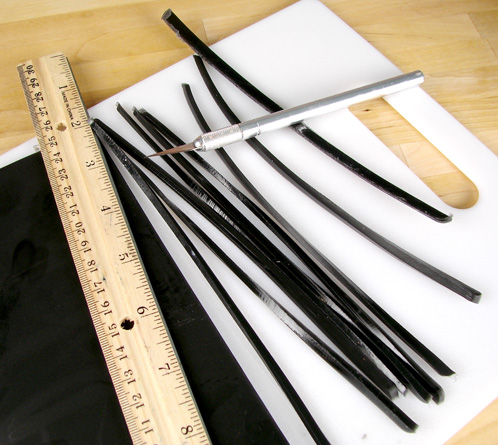
ONE: Prep the watermelon “seeds” by melting 2 ounces of clear soap base and mixing in a couple drops of liquid black. Pour the soap into one side of the glossy tray mold and let cool. Once the soap has cooled, release the soap from the mold and use a ruler and an craft knife to cut thin strips of black. You’ll need five long slivers.
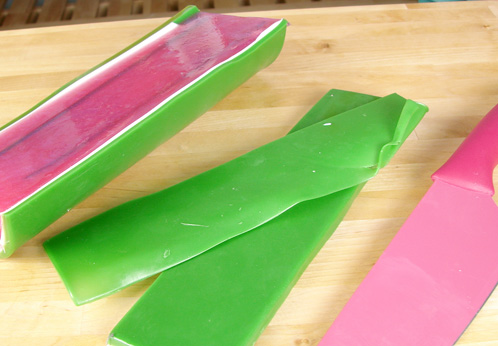
TWO: Now it’s time to make the “rind.” Melt 7 ounce of clear soap base and  mix in .7 ounces of liquid glycerin and 6-7 drops of liquid green colorant. Mix well and pour the soap into the tray mold. Spritz with rubbing alcohol to eliminate air bubbles. Let cool.
Hint: The liquid glycerin adds some pliability to the soap so we can bend it with out breaking.
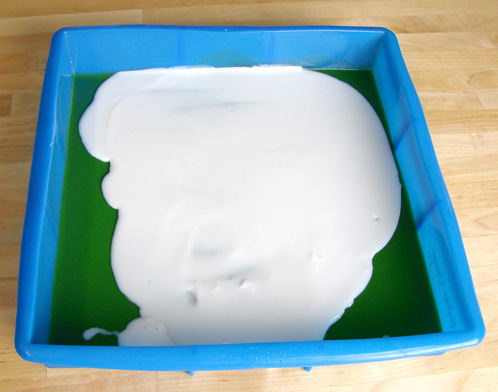
THREE: For the white layer of the rind, melt 3 ounces of white soap base and mix in .3 ounces of liquid glycerin. Let the white soap cool to 125-130 degrees, spritz the cooled green layer of soap and pour the white soap down the middle of your mold.
Tip: I wanted the white section of the rind to be super thin. Three ounces of soap isn’t quite enough to cover the entire bottom of the mold so make sure you pour the soap down the middle of the mold. It’s ok if the sides are not covered in white.
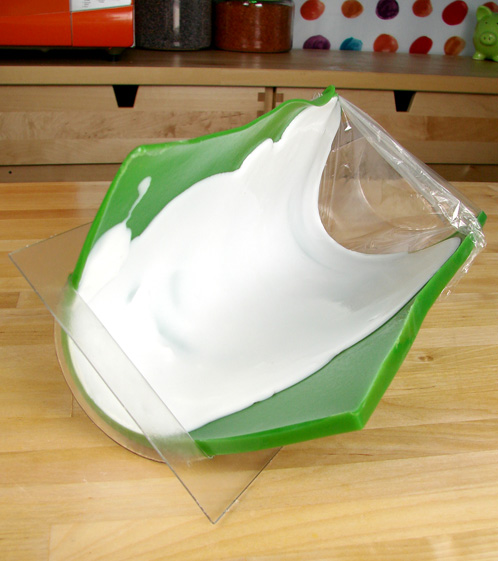
FOUR: It’s show time. Release the green and white soap from the mold, bend it down the middle and place it into the half round log mold. Make sure that the white soap is even on both sides. Scoot the soap to one end of the mold and press it down firmly. Seal the other end with plastic wrap. You can wrap some of the plastic underneath the soap if needed.
Tip: See how my mold is tipping a little bit? You’ll need to find something to prop up the mold. I used two small matching bowls.
FIVE: To make the sweet, inside of the watermelon, melt 12 ounces of clear soap base and mix in .5 ounces of watermelon fragrance oil. For the fantastic pink color, I combined non-bleeding red with red blue mica. Mix well and let the soap cool to about 130 degrees and have some plastic wrap on hand to cover the soap to keep it warm between pours.
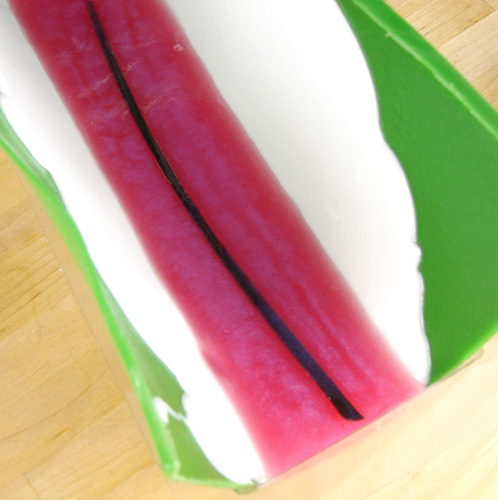
SIX: Spritz 1 long black sliver of soap and the white soap layer in the mold. Then pour about 1/3 of the pink soap. Place the long black strip of soap into the wet soap. Spritz with rubbing alcohol to get rid of any air bubbles. Then cover the remaining pink soap with plastic wrap to keep it warm. Let this layer cool for about three minutes and repeat this step two more times. On the second pour add two of the black slivers (one on each side of the original) and on the third pour add the last two black slivers (again on the outsides of the previous pour).
SEVEN: Once the juicy soap has cooled, unmold the soap and carefully slice off the long, green edges with a knife (and put it in your scrap soap bin). Then slice the watermelon in to guest size wedges.


Monday, July 4, 2011

4th of july robotic centerpiece

This Fourth of July craft is bursting with patriotic pizzazz! by Amy Kaldor-Bull From FamilyFun Magazine
July 4th Robot Craft for Picnic Tables See larger photo
Total Time Needed:   1-2 Hours
Do U need a GR8 helper 4 your picnic on the 4th? Well, this is one can-do robot. His recycled-can head holds a hair-raising array of utensils, and a clear container belly keeps cookies safe from eager little hands until it's time for dessert.
Materials
  • 2 cardboard tubes (toilet paper tubes, or wrapping paper tubes trimmed to about 5-1/2 inches)
  • 1 roll each of red, white, and blue duct tape
  • Clear 1-gallon, food-safe plastic pail (we got ours from stampendous.com)
  • 2 (15-ounce) unopened cans of food, with labels removed (for weight)
  • Clean, empty metal can or plastic bucket (ours is a 12-ounce peanut can)
  • Parchment paper (optional)
  • 2 metal bottle caps
Instructions
  1. Wrap the cardboard tubes with red and white duct tape. Affix an arm to each side of the pail with a loop of tape.
  2. Wrap the bottom of the canned goods with red tape. (Tip: Write the contents on the top of each can so that you'll know what's in them.) Place loops of tape on their lids, then press the pail into place on top.
  3. To make the robot's head, wrap the empty can or bucket with blue duct tape. Cut eyes from white duct tape and a mouth from red. (Tip: The eyes and mouth are easier to make if you first attach the duct tape to a piece of parchment paper. Cut out the shapes, then peel them off the parchment backing.) Attach the bottle caps to the white circles with loops of tape. Stack the head on top of the pail.
Happy Independence Day!!

Want to give a handmade gift?

About Me

i love to create and make. A few of my favorite things to make are soaps, dreamy creams, bath and body products, knitting, beading, paper crafts, and more! I also teach classes and offer private lessons in candlemaking, soapmaking, creams and lotions, body scrubs and other bath time treats (teas, milks, melts, bombs).