Showing posts with label soap. Show all posts

Monday, September 16, 2013

Soapy Cupcakes

Last month I had the pleasure of helping Ruth out in her Soap cupcake class at the Nova Studio.  This class uses some advanced techniques so some soaping experience is suggested.  Ruth previously taught this technique at the soapmakers conference earlier this year; I didn't attend so I was glad to see this class offered at the studio.  She brought more than 20 samples of yummy soap cupcakes and shared a variety of packaging options.  As a bonus, she also showed us how to make dainty soap meringues!  Below are photos from the class, including the 2 soap cupcakes that I made:-).  The soaps have cured now and are ready for use.  I gifted both already so I will definitely be soaping up a batch of cupcakes soon.  They make great hostess gifts, and are fun non-caloric treats.  This process does take a little more time and effort than the traditional rectangular bars of soap so if you plan to sell these, you may have to adjust your prices accordingly and also include a sign that says that they are not edible!  Both of the persons I gave the soaps too wanted to take a bite out of them!

Ruth in action!

More than 20 colorful soapy cupcakes 

 I heart big frosting tops!


Wednesday, October 10, 2012

Pink Grapefruit massage bars

I heart massage bars of all kinds - especially soapy ones.  Check out my last post back in January on these pumped-out massage bars.  This mold does look like a hedgehog, but it's nothing to sneeze at -  the quilted texture is just perfect for a spa-like experience and it's a very hefty bar at 6 ounces!  I made 15 of these beauties for an upcoming swap scented with Pink Grapefruit fragrance oil.  The smell is divine and I can't wait for my swap buddies to try this!

Massage bar on steroids - check out the nubs!

Friday, January 20, 2012

Pumped Out Massage Bars

I recently stayed at a hotel which had these nubby soap massage bars.  I really liked them but couldn't find a similar mold.


With that as my inspiration, i decided to super size the nubs and try this one out.  I poured two different colors - the nubby layer as glitter, and the base is white.  I love it!  The nubs last longer than the original and they provide a gentle massage while showering.  If you'd like to give this a try, let me know and I can post a few up on etsy.

Friday, December 16, 2011

Project Level:
Estimated Time: 1/2 Hour
Yields: (24) Lollipop Soaps

These clever little soaps make great presents by themselves or even to add to your gift wrap for a festive pop.  You can also make a version of this in paper if you are in a rush!

Ingredients
  • 2 Pound(s) Extra Clear Soap
  • 1 Chromium Oxide Green Pigment Color Bar
  • 1 Red Oxide Pigment Color Bar
  • 2 Ounce(s) Fragrance Oil - your choice
  • 24 Piece(s) Gingerbread Men (Mini) Toys
  • 1 Guest Round - Silicone Mold
Equipment
  • Cello Bags 2.5 x 2 x 6
  • Cookie Sheet
  • Freezer
  • Glass Pyrex Cups
  • Measuring Spoons
  • Microwave
  • Mixing Spoons
  • Plastic Bottle with Alcohol (spritzing)
  • Plastic Dropper
  • Soap Pop Sticks
  • Thermometer
Directions
    From: Wholesale Supplies Plus

  1. NOTE: If you are making these products for sale, good manufacturing practices recommend you wear a hairnet, gloves and a mask. We also recommend a clean apron.


  2. Place silicone mold on cookie sheet to make it easy to move when placing in freezer.


  3. Remove clear soap from 2 lb. plastic tray. Cut off one of the 4 squares which will be 8 oz.


  4. Cut 8 oz. block into smaller chunks and place in glass pyrex cup.


  5. Remove 1 square from the red pigment color bar. Add 1/2 of the square to the cut up clear soap. This will melt along with the soap.


  6. Heat in microwave until completely melted. Remove from oven.


  7. Add 7.5 ml of Mulberry fragrance and mix well.


  8. Carefully pour into mold cavities. Fill each cavity about 3/4 full. Spritz top of soap with alcohol.


  9. Place in freezer for about 5 minutes.


  10. While soap is setting up, cut off another 8 oz. block of clear soap. Cut up into chunks and place in separate glass pyrex cup.


  11. Place cup in microwave and heat until melted. Remove from oven.


  12. Add 7.5 ml of Mulberry fragrance. Mix well.


  13. Spritz top of red soap with alcohol. Checking to be sure temperature of melted soap is no higher than 125 degrees, carefully pour clear soap over the red.


  14. Take a gingerbread man and place in center of each soap cavity. Spritz top of soap with alcohol.


  15. Let set at room temperature for about 10 minutes. To check soap, gently press down on top of soap. If it is hard, it is ready to unmold. You want to be able to unmold the soap but have it soft enough to push the popsicle stick through.


  16. Placing soap mold into freezer will speed up the process but can also make the soap brittle and it may crack or separate when pushing stick into soap.


  17. Taking one popsicle stick, gently push into the colored soap behind the gingerbread man.


  18. Place each lollipop into cello bag and tie with ribbon.


  19. You will have a small amount of red soap left. You can melt this and pour into 1 or 2 cavities depending on the amount of soap left.


  20. Repeat above steps using the green color bar and continue making lollipops until all soap and toys have been used.


  21. Recipe should yield 24 lollipops - 12 red and 12 green or whatever color combination you would like.
  22. Tuesday, December 6, 2011

    May the Force be with you...

    have you wanted your very own carbonite han solo?  Hubby showed me these cool ice cube trays and I thought they would make good soap molds.  Now you can make your own soap shaped like a frozen han solo!  there's also R2-D2 for those more robotically inclined.  Either way, this is an interesting project for a star wars/sci fi fan and a good gift to give for those star wars fans on your list!

    Of course this is a japanese import - made by Kotokubiya with excellent detailing!

    
    Han Solo frozen in carbonite
     And here's R2D2...


    Friday, December 2, 2011

    Colorful loofah soap

    Here's what I've been working on in my soap lab!  Love the vibrant colors.  For directions on how to make loofah soap (not quite like these but pretty similar), check out this previous blog post.  I'll be teaching this soap in my upcoming melt & pour soap basics class.


    a rainbow of loofah!

    Wednesday, September 14, 2011

    Project: felted soap

    What is felted soap? it is a bar of soap wrapped with wool that has been felted.  The result is a soap and washcloth in one.  Wool has natural anti-fungal properties and will retain its freshness.  The wool helps the bar of soap last longer.

    When making felted soap, it's best to use cold process or hot process soap bars; melt and pour does not work as well.  This is a great project for soap scraps, and also ugly bars of soap. Once they are covered in wool, they become very pretty and unique.

    Jenne G from Harlequin Feltworks showed me how to felt. At first, I was unsure of how to handle the bar of soap and wool but I soon got the hang of it and it was fun!

    Materials
    • wool roving (either sheep or alpaca...you will need at least 50% wool content in your roving for this to work)
    • bucket of warm slightly soapy water
    • soap
    How to felt your soap:
    1. Remove any rough edges from soap by bevelling
    2. rip apart pieces of roving to create a "bed" for your soap.  Lay pieces flat horizontally and then overlay with vertical pieces.
    3. place your soap on top of this bed, and wrap the bar with the wool so it is completely covered.
    4. sprinkle water on the wool so that it is saturated.
    5. Once wet, start to gently press the wool into the soap.  Continue to do this for about 4 to 5 minutes until the wool is condensed and matted and feels stuck to the soap
    6. Dunk in water and rinse the soap out
    7. Let dry overnight before use.

    My first felted soap!

    Sunday, September 4, 2011

    Healthy Cupcakes?

    Can cupcakes be healthy and good for you?  When they are made from soap you betcha!  I made this soap cupcake for Vereika.  The cupcake is vanilla buttercream, and the frosting, which is soap as well, is scented with tangerine essential oil for a lovely orange creamsicle like frosting!  The sprinkles are jojoba beads.  It may be a little awkward to use initially but it is all useable.  I love treats like this which are all the yum with no calories!

    Here's another shot of it:

    Saturday, August 20, 2011

    Marshmallow Soap!

    I had fun yesterday making some yummy marshmallow soap.  They look good enough to eat and lather nicely.  The photo above is the finished project and are miniature marshmallows.  The photo below is a "kitchen" or "in process shot"  I may be making these for an upcoming swap so I wanted to practice.

    Saturday, July 16, 2011

    Project Tie Dye Soaps


    These swirl soaps look like tie dyes!
    Step 1: Add a few drops of color into the mold
    First prepare your mold. Select a liquid color of your choice. You can use 1 color or if you really want to get creative you can use a couple different colors. Randomly place drops of color directly into the mold (not too close together). You need to use at least 5-6 drops in total.  Next melt your soap in a double boiler or crock pot.

    Step 2: Pour the 2nd color over the dots to get a swirled effect
    Once your soap is melted, start to pour your soap into the mold, over the drops. Try to hit every drop to get the color moving. Go slow and steady until the mold is full. 
    -If you think you didn’t have enough drops in the mold, you can add a drop or two while you are pouring.

    -If you have a spray bottle of alcohol, and can do two things at once, try spritzing once or twice as you pour, it can give you cool swirl effects.

    -When you are done filling the mold (before the soap is dry), you can take the straight end of a spoon, place it into the soap, touching the bottom, and use it to swirl the color a little.

    The soap needs to cool now. It will probably take about 30-40 minutes. It should be cool to the touch before you try to remove it from the mold. Once it has completely cooled, release the soap by applying constant, even pressure with thumbs to the backside of the mold. You may need to gently pull one side of mold away from the soap bar to break the air seal and apply, even pressure to back.

    To keep it fresh until you’re ready to use or gift it, wrap the soap in plastic wrap, pulling it tight and snug, in the back of the soap bar. Use scissors to remove excess plastic wrap. You can decorate with strips of scrapbook paper and ribbon.
    from: Life of the Party (note: I am not a fan of their soap but I think this is a cool recipe.)

    Tuesday, July 12, 2011

    Summer Time Grass Soap

    Wednesday, July 6, 2011

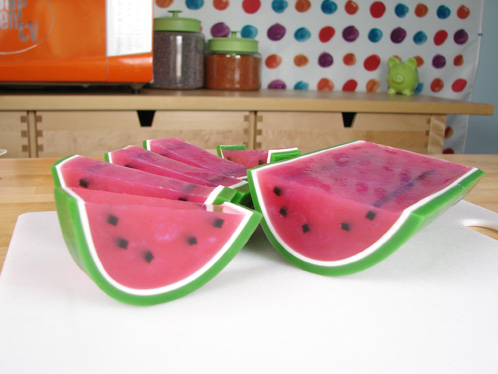
    Get Clean with Juicy Watermelons!

    Summer time reminds me of BBQs, pool parties, and yummy watermelons!  Here's a soapy version of this favorite summer time fruit.  This project incorporates a lot of interesting techniques you can use for other projects. 


    Ingredients
    OR buy all of the ingredients you need just by clicking on the “Buy It Now” icon below.

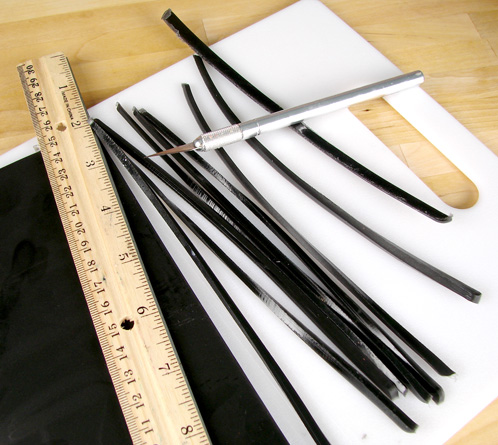
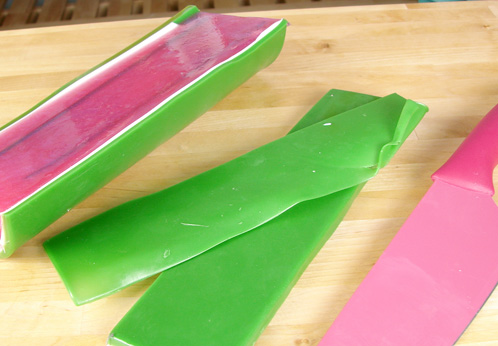
    ONE: Prep the watermelon “seeds” by melting 2 ounces of clear soap base and mixing in a couple drops of liquid black. Pour the soap into one side of the glossy tray mold and let cool. Once the soap has cooled, release the soap from the mold and use a ruler and an craft knife to cut thin strips of black. You’ll need five long slivers.
    TWO: Now it’s time to make the “rind.” Melt 7 ounce of clear soap base and  mix in .7 ounces of liquid glycerin and 6-7 drops of liquid green colorant. Mix well and pour the soap into the tray mold. Spritz with rubbing alcohol to eliminate air bubbles. Let cool.
    Hint: The liquid glycerin adds some pliability to the soap so we can bend it with out breaking.
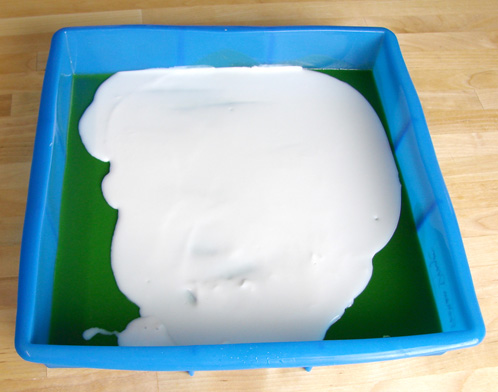
    THREE: For the white layer of the rind, melt 3 ounces of white soap base and mix in .3 ounces of liquid glycerin. Let the white soap cool to 125-130 degrees, spritz the cooled green layer of soap and pour the white soap down the middle of your mold.
    Tip: I wanted the white section of the rind to be super thin. Three ounces of soap isn’t quite enough to cover the entire bottom of the mold so make sure you pour the soap down the middle of the mold. It’s ok if the sides are not covered in white.
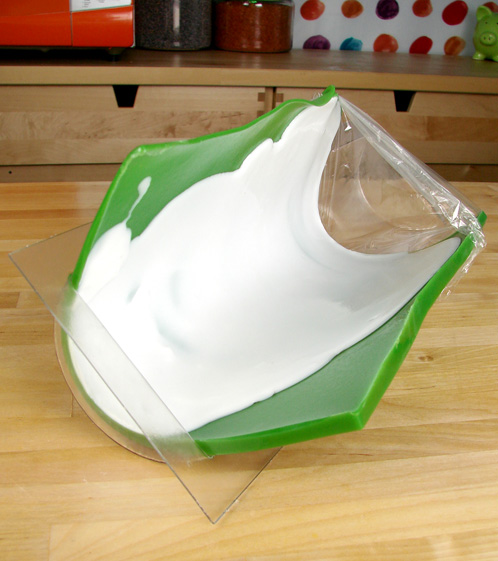
    FOUR: It’s show time. Release the green and white soap from the mold, bend it down the middle and place it into the half round log mold. Make sure that the white soap is even on both sides. Scoot the soap to one end of the mold and press it down firmly. Seal the other end with plastic wrap. You can wrap some of the plastic underneath the soap if needed.
    Tip: See how my mold is tipping a little bit? You’ll need to find something to prop up the mold. I used two small matching bowls.
    FIVE: To make the sweet, inside of the watermelon, melt 12 ounces of clear soap base and mix in .5 ounces of watermelon fragrance oil. For the fantastic pink color, I combined non-bleeding red with red blue mica. Mix well and let the soap cool to about 130 degrees and have some plastic wrap on hand to cover the soap to keep it warm between pours.
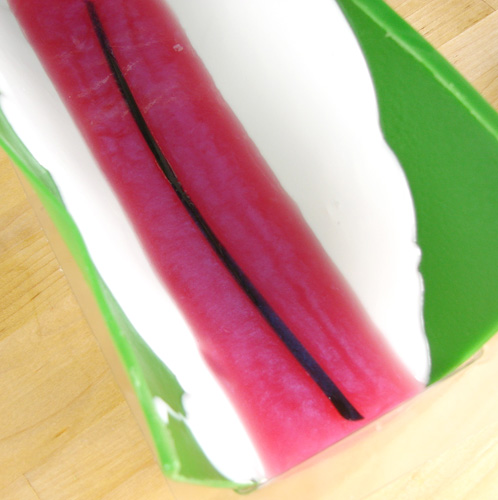
    SIX: Spritz 1 long black sliver of soap and the white soap layer in the mold. Then pour about 1/3 of the pink soap. Place the long black strip of soap into the wet soap. Spritz with rubbing alcohol to get rid of any air bubbles. Then cover the remaining pink soap with plastic wrap to keep it warm. Let this layer cool for about three minutes and repeat this step two more times. On the second pour add two of the black slivers (one on each side of the original) and on the third pour add the last two black slivers (again on the outsides of the previous pour).
    SEVEN: Once the juicy soap has cooled, unmold the soap and carefully slice off the long, green edges with a knife (and put it in your scrap soap bin). Then slice the watermelon in to guest size wedges.


    Monday, June 6, 2011

    Father's Day Soap Project: Vintage Baseball soap

    If your dad happens to be a baseball fan, hit a home run with this father's day present you can make from the Soapqueen.  I'm posting now so that you have enough time to order and make this in time for Father's Day, June 19.  You can buy all supplies for this project here from one of my favorite suppliers - brambleberry.com!


    Hold up!  don't get intimidated by the complex designs on the soap.  You use water soluble paper so it is easy peasy.  This soap can be made in five simple steps...

    Ingredients
    15 ounces of White Soap Base 
    1 ounce of Clear Soap Base
    Rubbing alcohol
    Baseball Clipart (check Flickr or iStock for great images)
    (yields 4 soaps)
    Get everything you need to make this project here.

    If you have never used Water Soluble Paper, check out the Water Soluble Paper Episode on Soap Queen TV to learn the basic technique, tips and tricks. 

    ONE: Print out 4 vintage baseball pictures on water soluble paper. Cut out the images and make sure that they will fit into the cavities of your mold.

    TWO: Once your images are cut out, spray them lightly with aerosol hairspray. This trick will help the colors stay vibrant once they are embedded in the soap. 


    THREE: Melt 1 ounce of clear soap base in a microwave safe container and mix in ½ drop of liquid blue colorant to give the soap a “clear” effect. For more information on the “bluing” technique, see the Embedding episode of Soap Queen TV.

    FOUR: When the clear soap cools to about 130 degrees (really hot soap might dissolve the paper), pour 1/8 inch of soap into the mold. As soon as a thin skin forms on the soap, immediately add your picture to the soap, face down. Let the soap layer cool.
    FIVE: Melt 14 ounces of white soap base and mix in 1/2 ounce of Yuzu Fragrance Oil. Once the melted soap cools down to 125-130 degrees, spritz the first layer of soap with rubbing alcohol and pour the second layer. Let the soap cool for 4-6 hours and pop it out of the mold.

    Thursday, April 28, 2011

    This Tangerine Soap from good ol' Martha caught my eye.  Fresh tangerine zest is used in this soap; because fresh fruit products are used, this soap should be consumed within 3 to 4 months.  This soap was molded in a juice container; as the soap set, the color -- from pureed zest -- became more intense at the top and bottom

    Read more at Marthastewart.com:
    Tangerine Soap - Martha Stewart Crafts

    Tools and Materials
    • Assorted citrus peels, berries, and herbs
    • Paper coffee filters, if using herbs
    • Clean, dry containers, such as milk cartons, drink boxes, juice-concentrate cans, or yogurt cups
    • Heat-resistant glass measuring cup or bowl
    • Vegetable oil cooking spray or petroleum jelly
    • Dough scraper
    • Glycerin soap base
    • Spray bottle
    • Rubbing alcohol
    • Paring knife
    Fruit and Herb Soaps How-To:
    1. Make PureesWash and dry all fruits and herbs; use whole berries, herb leaves, or citrus rinds with pith removed. Puree separately in a food processor. To make the herb purees, you may need to add 1 to 2 tablespoons water; place pureed herbs on a coffee filter, and wring out excess liquid before mixing into soap. Set purees aside.
    2. Prepare MoldsTo determine how much glycerin soap base you need, fill mold with water, then pour the water into measuring cup or bowl. Note the amount, pour out the water, then dry mold completely. Evenly coat interior of mold with cooking spray or petroleum jelly; wipe out excess.
    3. Melt SoapUse dough scraper to chop soap base into 1/2-inch pieces. Microwave soap in a glass measuring cup or bowl covered with a paper towel on medium in 30-second intervals until melted but not boiling. (A double boiler can be used instead.) Add more soap pieces as needed, and continue melting. Remove from microwave, and stir until smooth.
    4. Mix In PureesStart with 1 teaspoon puree per cup of soap. Add more as desired. The color will intensify as the purees steep in the warm soap; stir frequently to keep soap from setting. Heavy additives may settle at the bottom, while light ones float to the top. For consistent distribution, let the soap cool (but not solidify); then stir in puree, and pour into mold.
    5. Pour Soap into MoldsFill small containers 3/4 inch full with soap; for cartons, fill partially to form 1 bar at the bottom, or completely to make a block for slicing into bars. Spray surface with alcohol to eliminate bubbles. Let soaps set, 20 to 60 minutes, depending on size. Transfer molds to freezer for about 2 hours (this will help the soaps release from the molds).
    6. Release Soap From MoldsTear away cartons to unmold bars. For hard containers, pry soap away from the sides, and press bottom of container to release. Neaten soap edges with paring knife. Slice large bars into smaller ones. Use soaps within 3 to 4 months.
    From Martha Stewart Living, April 2011


    Read more at Marthastewart.com: Fruit and Herb Soaps How-To - Martha Stewart Crafts

    Tuesday, April 19, 2011

    Squeaky Clean Projects

    cool soap projects
    Over the weekend, Debbie came and taught a two-day soap project class - highlighting soaps from her Soapylove book.  I had made a few projects from the book and wanted to see her go through her process live.  It was a lot of fun, and I bought popsicle molds as well as a tray mold to enable me to do more of the projects in the book.  Here are some of the soaps from Sunday.  She even signed my book!!

    Wednesday, March 23, 2011

    Orange Loofah Soap

    Still on the scrubby theme but at least combining it with soap. The original recipe can be found from Wholesales Supplies Plus.  I made a few modifications, particularly in the fragrance department by choosing to use orange and vanilla essential oils, and the soap bases.  The WSP soap bases carry SLS and I prefer to use soap bases which are real soap with non-artificial ingredients and no detergent.

    Project Level: Beginner
    Estimated Time: 1 Hour
    Yields: Approx. (12) 5 oz Bars of Soap

    photo from Wholesales Supplies Plus
    Ingredients
      • 1 Pound(s) Goat Milk Soap Base or other white soap base
      • 2 Pound(s) Clear Soap base

      • 1 Ounce(s) Orange Essential Oil
      • 1 Ounce(s) Vanilla Essential Oil or Ylang Ylang Essential Oil 
    • A few drops of orange non-bleeding soap safe colorant
      • 12 Piece(s) Plastic Wrap For Packaging
      • 12 Piece(s) Loofah Slices - 7/8" Slices.  You can purchase loofah from the dollar store and then cut them to size to fit your mold.

    Equipment
      • Round Silicone Mold
      • Droppers - Plastic
      • Gloves
      • Crockpot or microwave

      • Pyrex or Microwave Safe Cup (16 - 32 oz)
      • Rubbing Alcohol with Fine Mist Sprayer
      • Soap Slicer/Cutter
      • Spoon

    Directions

  23. Using a soap slicer, cut clear soap into 1-2 inch pieces. The soap slicer is dull and perfect for this project. Do not use a knife as it is very sharp and the soap is slippery. The knife could slip causing injury.


  24. Place 8 oz of white soap base in a microwave safe glass container and heat for 30 seconds. Stir well. Repeat until soap is completely melted.


  25. Pour 1/4" of white soap into each mold cavity. Allow to cool until firm. Once goatmilk soap is firm, spritz with rubbing alcohol. Set loofah on top of white soap.


  26. Using a microwave safe glass container, place clear soap in a microwave and heat for 30 seconds. Stir well. Repeat until soap is completely melted.


  27. Add fragrance and color.  Stir until fully incorporated. 


  28. Immediately pour the orange soap over the loofah until the cavity is full.


  29. Allow to return to room temperature and remove from mold.


  30. Wrap in inexpensive plastic wrap. Pull tightly for extra clarity and to remove plastic wrap ripples.


  31. If you are sellling your soap, don't forget to label the soap to complete the package. Label according to FDA cosmetic label guidelines.
  32. Thursday, March 17, 2011

    Happy St Patty's Day - Green Beer soap tutorial

    Here's a creative St. Patty's Day project - Green beer soap!  Two ounces of Coors light beer is used in this project, and it's scented with a honey ale fragrance.  Soap takes about 4 to 6 weeks to cure so for next year, I would start this project in early to mid Feb for it to be ready in time for St. Pat's day.  This recipe is from Anne-Marie, the Soap Queen, and all items can be purchased at Brambleberry with the click of a button.

    Want to give a handmade gift?

    About Me

    i love to create and make. A few of my favorite things to make are soaps, dreamy creams, bath and body products, knitting, beading, paper crafts, and more! I also teach classes and offer private lessons in candlemaking, soapmaking, creams and lotions, body scrubs and other bath time treats (teas, milks, melts, bombs).